
Hi guys! As promised, here is the second part of ‘Quick Intro to Git’ topic. Here I will share my experience on working with git. I’ll walk you through with the steps needed to install the git command line and then use GitHub account to work with a repository and branches. I will try my best to keep this concise.
GitHub account
First step is to setup a git hub account. Visit this link. You can choose your personal plan based on your requirement.
Install Git command line
If you plan on using Git with GitHub only then you can probably live happily with GitHub desktop. This is a tool that gets installed to your local system and allows performing all the git operations with a simple to use user-interface. You would never have to worry about running commands at command line when you use GitHub desktop. But there are few points you might have to consider so please checkout their FAQ page. In this article I’ll explain the command line workflow.
Note: GitHub desktop also installs the git command line for you.
Configuration
Once you have installed git, next you would need to configure it. Git configuration can be performed at following levels:
- System Level
- git config –system
- Configuration file stored at c:\Program Files (x86)\Git\etc\gitconfig.
- User Level
- git config –global
- Configuration file stored at c:\Users\<USER>\.gitconfig.
- Repository Level
- git config
- Configuration file stored in .git/config under the repository.
Configuring user name & email
Depending upon which level you want to specify these settings at, choose the appropriate flag. I have set these settings at user level as I always want to use the same settings for all of my repos. Fire up your git shell command tool from your programs menu (i had a shortcut on my desktop) and run following commands:
#set user name
git config --global user.name "John Doe"

#set user email
git config --global user.email "johndoe@xyz.com"

#set editor
git config --global core.editor notepad

#list settings
git config --global --list
user.name=John Doe
user.email=johndoe@xyz.com
core.editor=notepad.exe
Create Repository on GitHub
First step is to create a new repository on GitHub. Go to github.com and sign in with your credentials. If you don’t have a user account, create one. Next create a new repository by clicking ‘+’ on top bar or go to https://github.com/new.

Creating a new repository on GitHub.
For the purpose of this article, i created my repo at https://github.com/amarsingh19/TestRepo. Next I created a local folder on my computer which will store the code from my repository. Using command prompt go to this folder and initialize this folder as a git project. For this run the following command:
 git init
 Initialized empty Git repository in C:/Test/GitProject/.git/
This will initialize an empty Git repo and you will see a special folder called .git which will be hidden. Do not fiddle with this folder unless you know what you are going to do. By default your working branch is called ‘master’.
Create new files & Commit
I used notepad to edit file like this:
touch FirstFile.txt
notepad.exe FirstFile.txt
Add following content and save your file.
This is first file.

Version 1

Branch: Master
Next just to check how git recognizes your files, run the following command and notice the output. Newly created files are not tracked by git.
#check the status of the files
git status


# On branch master
# Initial commit
# Untracked files:
# (use "git add <file>..." to include in what will be committed)
#           FirstFile.txt
Run following commands to add your file to git and commit.
git add FirstFile.txt
git commit -m "First Commit..."
# -m is for adding comment to the commit.
[master (root-commit) 987ff41] First Commit...
1 files changed. 5 insertions(+)
create mode 100644 FirstFile.txt
This way you can work with files and make edits locally. All your commits are being done offline. These are not yet pushed over to your GitHub repo yet.
Push your changes to your GitHub repo
You are now ready to push your changes to GitHub. If at this stage you would like to unstage the changes, you can use run git reset command. Before you push your changes you would have to add a remote reference to your repo on GitHub.
git remote add origin https://github.com/amarsingh19/TestRepo.git

#next push your contents to your repo
git push -u origin master
Now go to your git hub repository and refresh. You should see the new added file.
Lets make another change before we move forward:
notepad.exe FirstFile.txt
Modify the content of this file and change version to 2.
This is first file.

Version 2

Branch: Master
#check the status of the files
git status

#On branch master
#Your branch is up-to-date with 'origin/master'.
#Changes not staged for commit:
# (use "git add <file>..." to update what will be committed)
# (use "git checkout -- <file>..." to discard changes in working directory)
#
# modified: FirstFile.txt
#
#no changes added to commit (use "git add" and/or "git commit -a")
git add FirstFile.txt
git commit -m "Second Commit..."

#[master 1c01996] Second commit...
# 1 file changed, 1 insertion(+), 1 deletion(-)
git push -u origin master
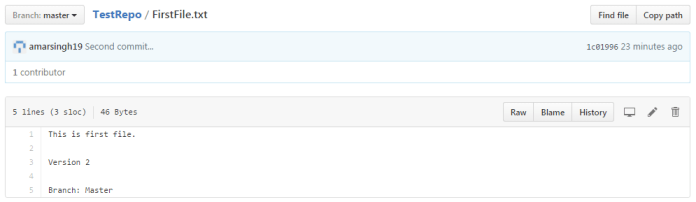
Now go to GitHub and open FirstFile.txt. You should see the updated version in the file content. 🙂
So by now you should be able to use the git hub command line to initialize a new repo locally and then commit your files to git hub.
This is all for this part of the article. In my next article I will brief you on how I created a feature branch and submitted a pull request and finally merge the changes from feature branch back to master branch.
