In today’s fast-paced business world, AI-driven chatbots have become essential tools, providing businesses with efficient, scalable solutions to interact with customers and manage data-driven insights. By harnessing the power of natural language processing (NLP), chatbots enable non-technical users to access complex data or perform routine tasks effortlessly. Whether it’s customer support, data analysis, or automating business processes, AI chatbots are proving to be game-changers.
What is Databricks Genie?
Databricks Genie, a feature within Databricks designed to allow your users to query their data through natural language questions. Genie empowers organizations to simplify their data workflows, enabling users especially non-technical domain experts, such as data analysts to gain insights without needing technical expertise. After set up, business users can ask questions and generate visualizations to understand operational data. This makes Genie particularly valuable in environments where quick decision-making is critical, and access to data insights must be democratized.
What is Genie Space?
Databricks Genie Space is a conversational AI tool that allows users to interact with their data simply by asking questions in plain language. Genie looks at the annotated tables and column names, reads their metadata (recommended) that helps Genie to convert natural language questions to an equivalent SQL query behind the scenes. Then, it responds with the generated query and results table, if possible. In situations where Genie is unable to generate an answer or doesn’t understand the question provided, it will respond with follow-up questions, based on further responses provided, it learns and re-attempts to provide a response.
Note: This feature is currently under Public Preview therefore to access it it needs to enabled by your workspace admin (read more).
How does it generate response?
To generate responses Genie uses:
- The natural language prompt submitted by the user
- Table names and descriptions – Make sure to provide meaningful metadata
- Column titles and descriptions – Make sure to provide meaningful metadata
- General instructions – You can provide multiple instructions to Genie
- Example SQL queries – You can provide example SQL queries especially in complex table relations
- SQL functions
How to Use Databricks Genie Space?
Access the Genie Space
- Log into your Databricks workspace.
- Navigate to the AI/BI section and select Genie from the toolbar.
Select or Create a New Genie Space
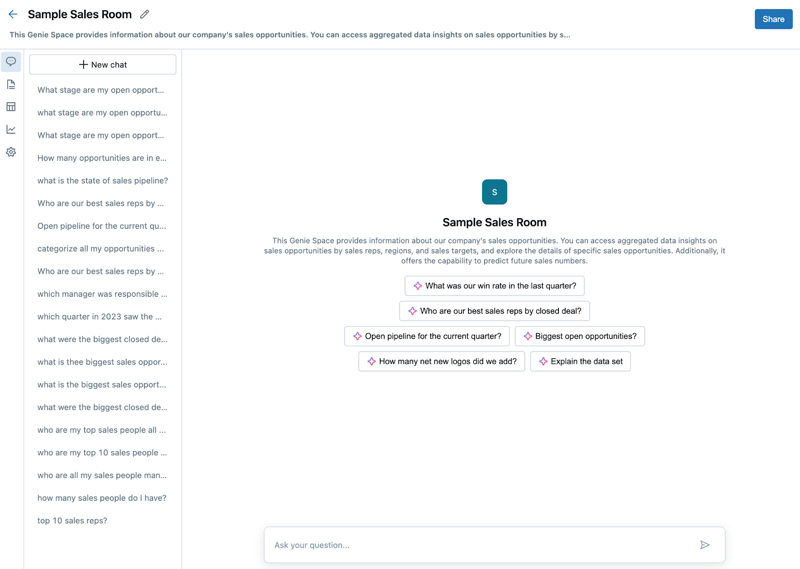
- From the Genie interface, select an existing Genie Space or create a new one.
- To create a new space, click on New, give it a relevant Title & Description.
- Select the tables you want to analyze.
- Ensure the data tables are relevant for your team’s inquiries. For instance, sales data or customer engagement metrics can provide critical insights.Bring in only the tables and columns needed to answer questions for a given domain

Ask Genie a Question
- Once your space is set up, start asking questions in natural language, such as “What are the top-selling products in Q3?” or “How did our customer engagement change over the past month?”
- Genie will respond with insightful answers, including relevant visualizations like charts and tables, making data exploration more intuitive.
Review and Refine Queries
- If the initial result isn’t quite right, you can ask follow-up questions or refine your queries. For example, “Show me the data broken down by region” will allow you to explore deeper insights.
Share Insights with Your Team
- Once you have the insights you need, share the findings with your team. You can export visualizations and reports directly from Genie or integrate them into existing workflows.
The Future of Conversational Data Exploration
By using Genie Space, businesses can empower their teams to work more efficiently with data, make informed decisions, and streamline processes, all while reducing the reliance on data engineers or analysts for routine queries.