Code generation, WebStorm

Live Templates – WebStorm

Live templates is another great feature of WebStorm which can really make your development very interesting. I personally find these to be very useful. You can utilize this feature to inject your favorite or very frequently used code snippets and make your life little easier. 🙂 You can utilize the live templates to inject any kind of code, be it html, java-script etc.

Let me give you some examples:

Live template can be created using the Live Templates page on the File -> Settings dialog Or by pressing Alt + F7 keyboard combination.

When the Settings dialog opens, search for live template by tying in the search field:

gotolivetemplate

And you will see the live templates box as below. You will notice that there are tons of templates that are already predefined by WebStorm for you.

settingsdialog

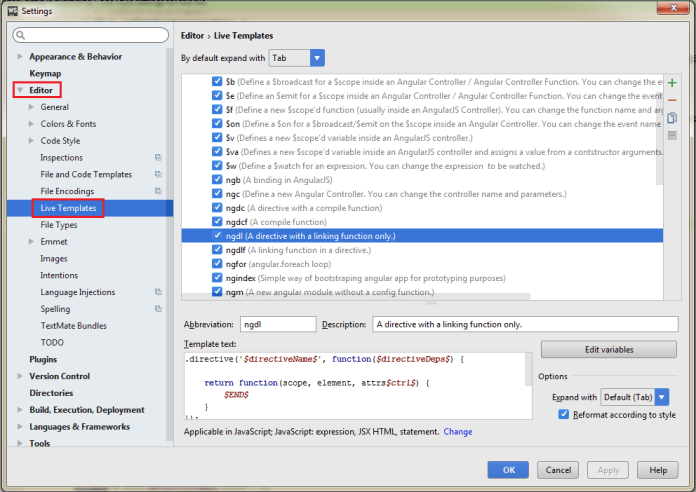
The highlighted template example shows that by typing ‘ngdl’, the code snipped defined in the template text will be injected into your code at the same position where you type ‘ngdl’ followed by a tab key.

Creating a new template

Now let’s understand this further by creating a simple template. Clicking on the ‘+’ icon on the top right of the dialog and choose Template Group. It is better to put your custom templates under your custom group. Give your group a name and press OK.

createlivetemplategroup

Next click on ‘+’ icon again and this time select first option to create a live template. Type your desired abbreviation (shortcut to your template) and provide a meaningful description to your template. In the template text box enter the code template/snippet that you would like to inject. In this example I have specified a template to generate an angular controller.


newtemplateforcontroller

Please make sure to choose a valid context for your template as below. Since the given template is a JavaScript code so I’d choose JavaScript option here.

context

Now let’s try to use it. Go to your project and create a new JavsScript file and open it. Now start typing the ‘myctrl’ abbreviation you have given in previous step. You will note that WebStorm gives you a hint that it found your template.

usingcontrollertemplate1

Now press tab and you will see your code snipped injected into productsCtrl.js file.

(function() {
     'use strict';
     angular.module('my-app')
     .controller('myCtrl', function() {
         var vm = this;
         Object.defineProperties(vm, {
             ctrlProperty: {
                 value: 1, writable: true
             }
         });
     });
 })();

@w3s0m3! 🙂

But! I still want to enhance this template further to make it more dynamic, I mean currently it is going to inject the controller code with name myCtrl every time, which isn’t of much help. So let’s try to make use of variables which is another feature live template provides. So go back to live templates settings dialog and modify your template as below:

newtemplateforcontrollerdynamic

Notice that there are bunch of words surrounded with ‘$’ signs. Live templates use this syntax to indicate a variable in the template which you can re-use or use to format and populate other variables.  Click on ‘Edit variables’ button and ensure you have following settings:

newtemplateforcontrollerdynamicvariables

Basically there are four variables:

  • moduleName – It takes whatever you type.
  • ctrlName – It takes whatever you type.
  • friendlyCtrlName – Notice that it has a custom expression. It would call certain predefined functions to format the string that it receives in ctrlName variable. Since you are defining the value of this variable from within the template, check the ‘Skip if defined’ box.
  • END – This is a predefined live template variable that indicates where should the cursor be when your template gets fully expanded.

Now go back to your js file, delete entire content and type ‘myctrl’ again and press tab key.

Notice the positioning of your keyboard caret is where your first variable ($moduleName$) was defined.

usingctrltemplate1

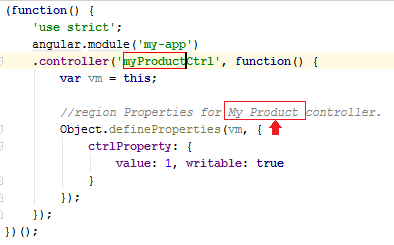
Type my-app and press tab. The focus will be now on the controller name. Start typing your controller name, notice that while you are typing the name of the controller the comment gets created automatically. Also because of the capitalize and spaceSeparated functions we used, ‘myProduct’ got converted into ‘My Product’ for us.

usingctrltemplate2

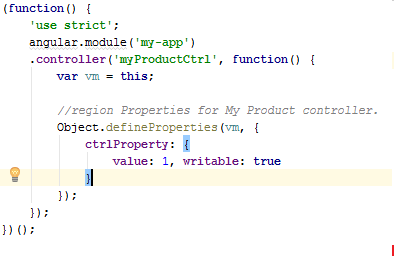
Press tab and now the cursor is set where you had defined $END$ in the template. I had set it at this position if you would like to define more properties to the controller so you are at correct position to do so:

usingctrltemplate3

Another Template

Similarly I have defined a useful template to generate the code for defining the object properties. Here is the template:

template2

And here is the output when I type ‘prval’ followed by tab key. Property name and the assigned value, both are used to generate a user friendly comment.

template2usage

Similarly you can define various such templates in your code to generate your html, JavasScript code components and it enhances your code quality and consistency.

I hope you find this article useful!

Advertisement
Standard
nodejs

To “Gulp” or to “Grunt”

Well, the answer is what you prefer! 🙂

Both of these are great tools to automate the tasks for your application. Both have great plugins and allow the developers to really speed up their development cycle by integrating some very cool plugins to automate your process. For instance code analysis, linting, minification and many more, but the question is what would you choose?

Here are some high level differences:

Grunt Gulp
Matured.

More support and bigger community.

More than 5000 plugins.

Relatively newer.

Lesser number of plugins


File based

Each task input/output spins up hard-disk as the results are stored in the hard-drive. Multiple tasks require multiple disk read/writes.

Stream based

Gulp uses in-memory streams to run multiple tasks sequentially. Therefore only the final output results in disk activity.

Might perform slower when there are multiple tasks configured. Relatively faster due to in memory processing.
 

Configuration over code.

Tasks are configured using configuration files. This configuration method requires the developer to be knowledgeable of the options for each task.

Gulp prefers code over configuration. Developers might find themselves comfortable with this as it is easier to understand and debug.

Also here are the sample files:

Sample Gulp file

var gulp = require('gulp');
var args = require('yargs').argv;
var $ = require('gulp-load-plugins')({lazy: true});
var config = require('./gulp.config')();
var del = require('del');

gulp.task('vet', function(){
    return gulp.
    src(config.alljs)
        .pipe($.if(args.verbose, $.print()))
        .pipe($.jscs())
        .pipe($.jshint())
        .pipe($.jshint.reporter('jshint-stylish', {verbose: true}))
        .pipe($.jshint.reporter('fail'));
});


gulp.task('styles'/*, ['clean-styles']*/, function(done){
 return gulp.
    src(config.less)
        .pipe($.plumber())
        .pipe($.less())
//        .on('error', errorLogger)
        .pipe($.autoprefixer({browsers: ['last 2 version', '> 5%']}))
        .pipe(gulp.dest(config.temp));
});


//----- MORE TASKS


Sample Grunt file

module.exports = function(grunt) {
  grunt.initConfig({
    jshint: {
      files: ['Gruntfile.js', 'src/**/*.js', 'test/**/*.js'],
      options: {
        globals: {
          jQuery: true
        }
      }
    },
    watch: {
      files: ['<%= jshint.files %>'],
      tasks: ['jshint']
    }
  });

  grunt.loadNpmTasks('grunt-contrib-jshint');
  grunt.loadNpmTasks('grunt-contrib-watch');

  grunt.registerTask('default', ['jshint']);
};

Most likely if you are just starting up a new project and don’t have much prior experience with these tools then I would assume that you’ll be leaning toward choosing gulp as your task automation tool because of its ease of use and performance but again I will leave it up to you to decide.

References:

http://gruntjs.com/

http://gulpjs.com/


Standard
Uncategorized

== vs ===

JavaScript language provides two comparison operators for comparing the equality of the two values. It sometimes can cause a big confusion to the execution of the code if it is not clearly understood how these internally works. I’ll try to explain these differences using some examples.

Type Coercion

Type Coercion means that when the operands are different types, one of these operands will be converted to an equivalent value of the other operand’s type. This comparison is mostly done to a number. This implicit conversion process is known as Type Coercion.

For example: ‘2’ == 2 returns true.

‘==’ equality operator

A.k.a. loose equality operator and are considered evil by some. They are evil because syntactically the code would just look just fine but the output of the comparison could be something like unexpected. Here is the reason why this unexpected behavior can happen. == Operator tries to implicitly convert the type of one of the operands to a common type and then doing the comparison between them. Java-script would not complaint about the types mismatch but try to smartly do type coercion and present a result. Few developers find it scary and it can cause various bugs into the system. Consider following examples and see for yourself what this can cause:

1 == 1 //returns true;

1 == ‘1’ is executed as 1 == ToNumber(‘1’), hence 1 == 1 // returns true

‘1’ == 1 is executed as ToNumber(‘1’) == 1, hence 1 == 1 // returns true

undefined == null // returns true

new String(“”) == true//returns true because an object is always true

“” == true //returns false because empty string is considered false

“” == false //returns true because empty string is considered true.

Above mentioned examples apply to all condition constructs in JavaScript for example an ‘if’ statement.

‘===’ equality operator

A.k.a. strict equality operator would also take into account the data type of the operands before doing the comparison. It will simply return false if the types are different. In case of objects, the instances being compared should refer to the same instance to be truthy.

Here are some examples:

1===1   //returns true

1===’1’ //returns false

“” === false //returns false


Standard